
Blogger was down for 3 days, and in the process lost my Hedgehog Rolls post. This is a duplicate. 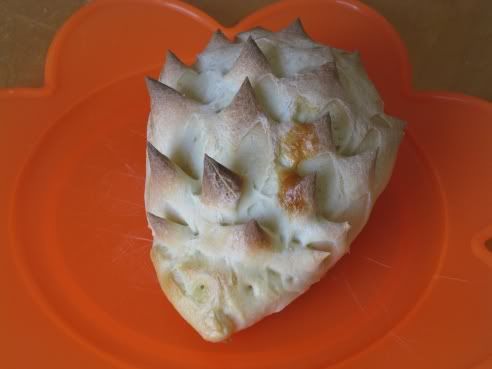 |
| This was the only one that turned out NOT looking like it had been run over by a car, or as my daughter just said, "demented". |
 |
| March of the demented hedgehogs! |
My other daughter was hit really hard by this bug, after two days she's still not quite healthy. So I thought I would make some rolls to cheer them up, but in the shape of hedgehogs.
I got the inspiration from a recipe on this week's Yeastspotting page, "Honey Hedgehog Bread", but used an adapted Hoagie/Kaiser roll recipe from the bread book I got on Mother's Day, Artisan Breads at Home by The Culinary Institute of America (CIA). I added an egg, used honey and butter instead of sugar and oil.
The original recipe calls for using a mixer, but as I do everything by hand I have adapted the instructions. I found the dough very stiff to work with, I think it would cause a lot of damage to my mixer if I tried it in my KitchenAid. In fact, the book tells you to have two of the same mixers in case one burns out. I don't know about you, but one mixer is all I really need or could justify owning.
Hedgehog Rolls
adapted from "Hoagie/Kaiser Rolls" in Artisan Breads at Home by The Culinary Institute of America (CIA)
makes 12 rolls
1 2/3 cup water (80F)*
4 tsp honey
3 1/2 tsp butter (19g)
1 egg
5 cups + 3 Tbs bread flour**
2 tsp yeast***
2 1/2 tsp salt
egg wash:
1 egg
2 tbs water
In a large bowl, add your water and sprinkle with yeast. Add the butter and egg, whisk to mix.
Add the salt and the flour, cup by cup, stirring to combine. As you add the last parts of the flour, you'll notice that it gets harder to incorporate the flour.
This is the step that I think would kill your mixer, it's safer to do it by hand. It takes longer, but you'll be guaranteed not to blow out your mixer:
Turn the dough out onto a kneading surface, if you have unincorporated flour, that's okay. Begin to knead that flour into your dough as best as possible, letting the dough rest for 5 minute intervals as it fights back. Keep at it until all the flour is incorporated, continuing to let it rest as need be.****
Once your dough is smooth and elastic, form it into a ball.
Grease your bowl, return the dough ball back to the bowl, turning it over to grease the entire ball. Cover and let rest for 60 to 90 minutes, until it has doubled in size. No matter how long it takes, make sure it doubles in size!
When it has doubled in size, degas the dough and recover. Let rise 60 minutes, until about doubled in size. The original recipe calls for one rising, but I want these nice and tender. You can skip the second rising and go right into the shaping.
Using a (hopefully) digital scale, weigh the dough. Divide that number by the number of rolls you want and cut and weigh each piece of dough to make sure it comes out the right weight per roll.
Line a cookie sheet with parchment paper.
Preheat oven to 425F.
 |
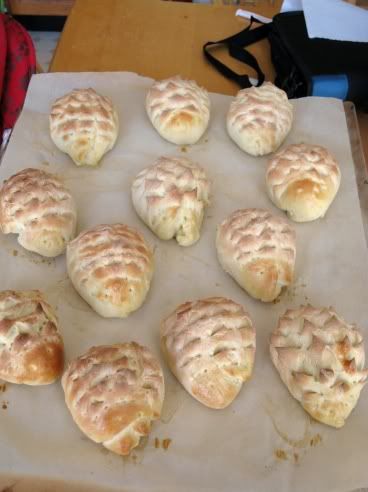
| Sheet of shaped rolls |
 |
| close up of one shaped roll |
Form the dough into an egg-shape, then elongate the small end to make it a pointy shape, like the end of a football.
Place the dough, seam-side down, on the prepared baking sheet. Cover with plastic wrap and set aside until doubled, 30 minutes.
With your fingers, the dull side of a knife, or a similar tool, make an indent around the very tip (no more than 1/4 inch) of the pointy end of the dough. You don’t want to cut through the dough – just make an indent all around. Then, with your fingers, form that small bit at the end into a small round ball that will be the nose.
The eyes should be placed about 2 inches up from the nose. Use a small scissors or a small sharp knife to cut two small circles into the dough to form the eyes. You don't want to remove the center and leave a hole - just cut circles into the dough about 1/8 inch deep.
Starting just above the eyes, use the scissors held almost parallel to the surface of the dough to make small snips in the dough to create the spines of the hedgehog. Continue snipping from side to side all the way to the large end of the dough so the entire surface is covered with “spines.”
With a pastry brush, apply the egg wash to the face area of the hedgehog, stopping before the spines.I should note that I used a kitchen skewer to poke holes for eyes and make the rounded bit of face. This could be why mine didn't turn out cute, more like zombie-like and scary.
Bake for 30 minutes, until nicely golden brown. Remove to wire rack to cool.
My hedgehogs look really weird, but hopefully with practice I'll get the shaping and the cutting down. By my 12th hedgehog I finally figured out how to angle the scissors!
Notes:
* I used slightly warmer water, about 95F, and wound up adding about 3 tbs more water as the dough was quite stiff. I added the water via spraying it on the bread dough with a plant mister, and dissolving 1/2 tsp more yeast in 1 1/2 tbs water to add to the dough.
** I found the dough to be quite stiff and dry, despite adding 1 egg not called for in the recipe.
*** Recipe calls for 1 1/2 tsp yeast, but as I used an egg and butter I added 1/2 tsp more to compensate for the rising issues involved in using egg and butter in recipes.
**** I have a problem with my doughs ripping instead of stretching, even after I knead and rise them. Having done some research, I found that this could be cause by two things. The first is too much flour in the dough, the second is not kneading long enough. If you suspect that you have added too much flour, spray your dough with a plant mister then knead the water into the dough. Continue to do this until you feel the dough is sufficiently hydrated. The kneading issue is difficult as by hand a basic knead is 8 to 10 minutes. For some dough, particularly enriched doughs with butter and eggs, it can take longer. So if you knead by hand as I do, do a set of knead/rest stages. Knead for 5 minutes, rest for 5 minutes, knead for 5 minutes, rest for 5 minutes until your dough no longer wants to rip. For a little bit more information, click here.
Submitting to yeastspotting.
Peter, my husband, said; 'yes, they look a little bit demented. But still he thinks this is the nicest roll he saw lately on Yeastspotting. Great idea. I think the one you send to Yeastspotting looks so lovely I will try to make them too.
ReplyDeleteThank you, Connie! And Peter! :) You words are very very kind, and I appreciate them.
ReplyDelete